Series: Part 1 Part 2 Part 3 Part 4
License Options
Overview
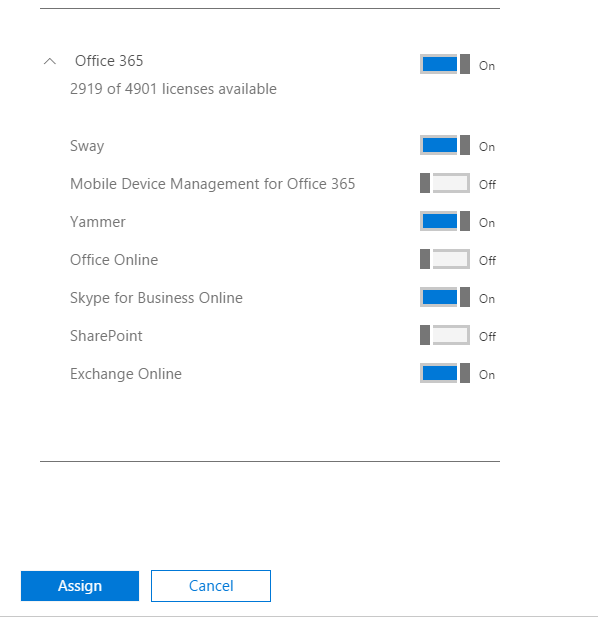
In the previous blog post I showed you how to connect to Azure Active Directory using PowerShell and assign a license sku to an Office 365 user which entitles a user for all the services contained therein. In many cases this is sufficient, but some organizations may have more specific needs regarding what services are available to its’ users. For instance, you may want to provision Exchange to your users after you’ve migrated from another mail service, but you want to wait a bit to deploy Sharepoint, Skype for Business, and Onedrive for Business until your users have gotten used to Office 365. To achieve this you’ll need to use selective license entitlement. This can be done in the Admin Center by deselecting the services that are included with a license sku,

but to do this in bulk we’ll need to use PowerShell.
Finding available service plans
Each license sku in Office 365 contains one or more service plans that can be enabled to provision a service for a user. These service plans include things like Exchange, Sharepoint, Skype for Business, and even external services like Sway or Intune. In part 1 of this series we looked at the Office 365 Enterprise E3 license - let’s take a look at how to find the services that are available in that sku:
PS> Get-MsolAccountSku | Where-Object AccountSkuId -like '*enterprisepack*' | Select-Object -ExpandProperty ServiceStatus

ServicePlan                   ProvisioningStatus
-----------                   ------------------
SWAY                          Success
INTUNE_O365                   PendingActivation
YAMMER_ENTERPRISE             Success
SHAREPOINTWAC                 Success
MCOSTANDARD                   Success
SHAREPOINTSTANDARD_ENTERPRISE Success
EXCHANGE_S_ENTERPRISE         Success
So we can see that the service plans available to assign from the Office 365 Enterprise E3 license are:
- Sway (SWAY)
- Yammer (YAMMER_ENTERPRISE)
- Office Web Apps (SHAREPOINTWAC)
- Skype or Business (MCOSTANDARD)
- Sharepoint (SHAREPOINTENTERPRISE; includes Onedrive for Business)
- Exchange (EXCHANGE_S_STANDARD)
NOTE: If Intune’s status is marked as PendingActivation it’s because you haven’t purchased that service.
Assign selected service plans
Last time we licensed Honest Abe with all included service plans in the Office 365 Enterprise E3 license, so this time we’ll find someone else and assign only select service plans from the license.
PS> Get-MsolUser -UnlicensedUsersOnly

UserPrincipalName                DisplayName       isLicensed
-----------------                -----------       ----------
Abe.Lincoln@whitehouse.gov       Abe Lincoln       False
Grover.Cleveland@whitehouse.gov  Grover Cleveland  False
Ronald.Reagan@whitehouse.gov     Ronald Reagan     False
This time we’ll pick Ronald Reagan, and we only want to give him Exchange and Sharepoint. To do this, we need to learn a new cmdlet - New-MsolLicenseOptions. We’ll run this before running the Set-MsolUserLicense cmdlet in order to configure the settings we want to assign along with the license. Pay special attention to the -DisablePlans parameter of New-MsolLicenseOptions, as this is how we configure selected service plans. Repeat - Enabled service plans are configured by setting those that we want to be disabled. If this sounds a little backward to you, then you’d be right and it can be problematic, and we’ll talk more about that in a later post.
PS> New-MsolLicenseOptions -AccountSkuId whitehouse:ENTERPRISEPACK -DisabledPlans SWAY, YAMMER_ENTERPRISE, SHAREPOINTWAC, MCOSTANDARD

ExtensionData AccountSkuId                                         DisabledServicePlans
------------- ------------                                         --------------------
              Microsoft.Online.Administration.AccountSkuIdentifier {SWAY, YAMMER_ENTERPRISE, SHAREPOINTWAC, MCOSTANDARD}
Here we can see that running this command outputs an object of type Microsoft.Online.Administration.LicenseOption which can passed to the Set-MsolUserLicense cmdlet. In order to do that, we’ll need to save this object in a variable:
Assign selected service plans from multiple licenses
We can assign multiple licenses at the same time and still enabled selected plans by doing the following:
Conclusion
In this article I’ve shown you how to assign a license sku to an unlicensed user while enabling selected service plans. In part three of this four part series I’ll show you how to modify the enabled service plans for a user who has already been licensed.
Thanks for reading and I hope you found this article useful!
