
If you’re building PowerShell modules and want to get your feet wet with development concepts like unit testing and release pipelines, check out my PlasterTemplates module on Github. This template will scaffold a new module project that supports a basic release pipeline model with the following features:
- Editing in Visual Studio Code
- Unit testing with Pester
- Markdown documentation with PlatyPS
- Source control in Github
- Continuous integration in Appveyor
- Module versioning
Plaster
Plaster is an open source project from the PowerShell Team that helps you create new PowerShell projects from templates. It can be used directly from the command line and is also drives new project creation in the PowerShell extension for Visual Studio Code. To learn about creating your own Plaster templates, read the tutorials linked in the Github readme. You’ll have to futz with the XML manifest a bit to get it working the way you want, but overall I found it relatively easy to get a new template up and running.
The PlasterTemplates module currently only includes one template - AppveyorCI. This is what we’ll be talking about in the rest of this article.
Plaster With VSCode
Before you get started, make sure you’ve followed the instructions on the module’s Github page to install it in your PSModulePath, and that you’ve installed Visual Studio Code with the PowerShell extension.
In Visual Studio Code, press F1 to launch the command palette, and then type in “Plaster.” Select the command “PowerShell: Create new project from Plaster template.” Wait a moment, and then select “Load additional templates from installed modules.” Wait a few more seconds while Code scans your module path, and then select the template “AppveyorCI.” Next, enter the path where you’d like your module directory to be created. The next step is a little tricky if you haven’t used Plaster in Code before - after you’ve specified a directory, Plaster will begin prompting you for template-specific parameters, but this is done in the integrated terminal instead of the command palette. If the terminal window is not visible it will look like Plaster’s execution stopped. Press Ctrl+` to bring up the terminal window and you’ll see that Plaster is waiting patiently for your input. Answer each prompt and you’ll soon have a new instance of Code with your module’s directory opened.
The prompts you see in the integrated terminal are parameters for the AppveyorCI Plaster template and are important for scaffolding the module correctly. The Github username parameter in particular is important to get right as it will be used a several places to facilitate testing.
Plaster From the Shell
Of course, since Plaster is a PowerShell module, you can also spin up your new module directory using Plaster at the command line rather than in Code. To create a module project exactly the same as the above example in Code, run this command:
Invoke-Plaster -TemplatePath "C:\Program Files\WindowsPowerShell\Modules\PlasterTemplates\AppveyorCI\" `
               -DestinationPath 'C:\Repos\NewModule' `
               -Author "Matt McNabb" `
               -ModuleName NewModule `
               -Description 'a new module' `
               -MinimumPowerShellVersion '3.0' `
               -GithubUserName mattmcnabb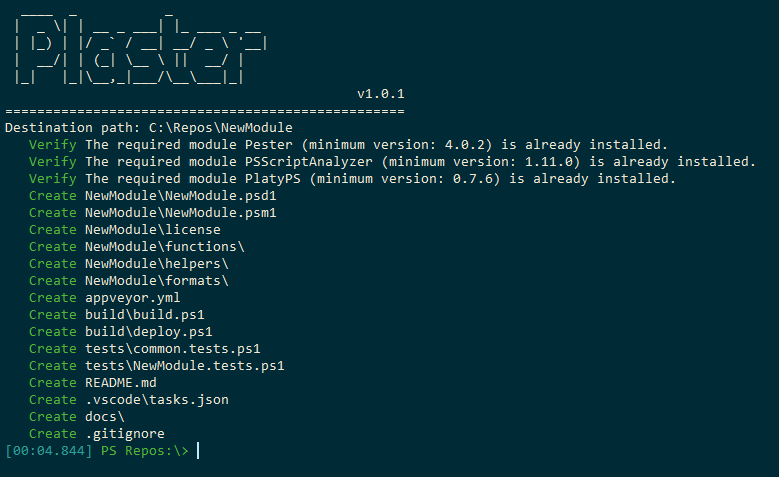
Push to Github
Now that you’ve got a project folder ready to go, you’ll need to initialize it as a git repository and push it to Github. Learning git and Github is much too large a topic for this post, so if this is unfamiliar to you please refer to the getting started tutorial here. Your Github repo will act as a central source for your code changes and will trigger your builds in Appveyor.
Add Your Project to Appveyor
Once you have an active Github repo containing your new module built with Plaster, you’ll need to add the project to Appveyor. Appveyor supports sign in with your Github account which makes it easy to add your repos. Once signed in, click on “New Project” and select Github as the source. Then select your new module repo from the list of available repos. From this point on when you commit changes to your Github repo, a new build job will be triggered in your Appveyor project and all your tests will be run.
Build Locally
Now that all the project details are in place you can begin working on the actual code in your new module. As you write new functions, tests and documentation you’ll want to check that everything is working before you push to your Github repo. To facilitate this, the AppveyorCI template comes with a handy build task that can be run in Code. Press Ctrl+Shift+B to build the project and run all your tests (there are some basic tests included with the template). In order for your local builds to work, you’ll need to make sure you have some dependencies installed:
- PSScriptAnalyzer
- PlatyPS
- Pester
I decided not to force installation of these dependencies on local builds to make the execution run quickly. Just know that if you don’t have these installed then the build won’t work.
A note on versioning: As you’re making changes to your code you may want to increment your module version. The AppveyorCI template starts with a version of 0.1.0. Don’t make any changes to the version number in the module manifest itself. Instead, increment the module version in the appveyor.yml file. The module version entry starts like
0.1.{build}. Increment the first two numbers as you see fit and each successive build in Appveyor will be appended as the final number.
Build in appveyor
Appveyor will now run a build on your repo any time a new commit is pushed to your Github repo. If you’d like to skip a build, make sure your commit message includes the text “[skip ci]” or “[ci skip].” Appveyor builds are a new environment every time, so you may have to wait a few minutes for the environment to get up and running. Also note that each build will download and install some dependencies from the PowerShell Gallery.
Publish to the PowerShell Gallery
If you believe your module is ready for publishing to the PowerShell Gallery, the AppveyorCI template can do that for you. You’ll need to make sure you’ve added your PowerShell Gallery API token to the Appveyor.yml file in the project. to do this, you’ll first need to register an account with the PowerShell Gallery, then copy out your API key. Next, go to your Appveyor account and generate a secure variable using your PowerShell Gallery API key. You can save the value of this secure variable in the appveyor.yml file in your module repo.
Now when you make a commit and you’re ready to deploy to the Gallery, make sure you include the text “!Deploy” at the beginning of your commit message. Assuming all your tests pass in the Appveyor build, your module will be uploaded to the PowerShell Gallery using your secure API key.
Future Plans
I have some ideas that I’d like to add to the AppveyorCI template in the future, if I can figure out how.
For one, I’ve been kicking around ideas regarding autogeneration of format XML files. A high-quality PowerShell module should include formatting for custom types, but writing the XML for these format files can be a real pain. I’d like to be able to write simpler documents or a simple PowerShell script that can be parsed to generate these files for me - similar to the way PlatyPS works. If that project ever comes to fruition then the AppveyorCI template will be updated to support it.
Another idea I’ve thought about is conditional testing/build scripts. There is already some separation between how tests are run locally and how they are run in Appveyor. This could grow a bit and it might be worthwhile to invest time in the build task to support testing conditions, like Pester tags for example. There might be a use case to have different build tasks or prompts that allow you to test only certain features, or even to add support for testing on Linux and Mac.
Make it Your Own
If you find this Plaster template useful, but are expanding into new territory with your testing and release pipeline, please feel free to fork it and take off in a new direction. For instance, if you’d like to add support for any of the build tools out there such as Psake or PSDeploy you can absolutely do that. My goal here was to get started with as little a learning curve as possible and so far it’s working for me. To see an example of a project using this template, check out my OneLogin project on Appveyor.